Beginner Deadlift Form Guide for Stronger, Safer Lifts
 Reading Time: 16 minutes
Learning proper beginner deadlift form primarily involves developing a repeatable hip-hinge pattern that lets you lift from the floor while controlling the weight, maintaining balance, and keeping the load close to your body.
A well-executed deadlift should feel like a powerful standing movement rather than a test of how much discomfort you can tolerate.
Your feet press into the floor, your trunk stays braced, and your hips and knees extend together as the weight rises.
Throughout my professional basketball career, I have used conventional deadlifts, trap-bar deadlifts, Romanian deadlifts, and single-leg deadlifts for different purposes.
Each deadlift variation can strengthen your posterior chain, but the best option depends on your anatomy, experience, mobility, equipment, and training goals.
This beginner deadlift form guide explains how to build the movement safely, spot common mistakes, and choose the deadlift variation that best suits your body.
What Muscles Do Deadlifts Work?
The deadlift is a compound exercise that trains nearly your entire body, although the hips, legs, and trunk perform most of the work.
Your glutes and hamstrings contribute to hip extension, while your quadriceps help extend your knees as the weight leaves the floor.
Your erector spinae, abdominal muscles, upper back, lats, forearms, and grip stabilize your body and keep the load under control.
Research examining deadlift variations confirms that muscle recruitment changes based on the implement, stance, range of motion, and technique used.
Conventional deadlifts generally produce substantial posterior-chain involvement, while trap-bar deadlifts typically allow greater knee contribution and Romanian deadlifts place greater emphasis on the hip-hinge pattern (Martín-Fuentes et al., 2020).
The deadlift is often called a “back exercise,” but your arms and back should not pull the weight independently. Your back primarily maintains position while your hips and legs produce the movement.
Deadlifts can complement squats because the two exercises emphasize overlapping but distinct movement patterns.
Squats generally involve more knee flexion, while deadlifts usually emphasize hip extension and posterior-chain strength.
What Is the Best Deadlift for Beginners?
The best deadlift for beginners is the variation that allows you to maintain balance, control the load, and repeat the same basic technique from one repetition to the next.
For many beginners, that means starting with one of these options:
- Kettlebell deadlift from an elevated surface
- Trap-bar deadlift with high handles
- Barbell deadlift with the plates elevated on blocks
- Conventional deadlift with light bumper plates
Although the conventional deadlift is the variation most people picture, you do not have to begin there.
Pulling from the floor requires enough hip mobility, body awareness, and positional strength to reach the bar without losing control.
Your limb lengths also influence your starting position.
A tall lifter with long femurs may begin with higher hips and a more inclined torso than a shorter lifter, even when both people are using effective technique.
As a 6’10” athlete, I have learned that copying the setup of a much shorter lifter rarely works.
The goal is to satisfy the main principles of the movement rather than imitate someone else’s exact joint angles.
Beginner Deadlift Form: Step-by-Step Instructions
Most deadlift problems begin before the bar leaves the floor.
A patient, consistent setup makes the actual pull much easier.
Step 1: Position the Bar Over Your Midfoot
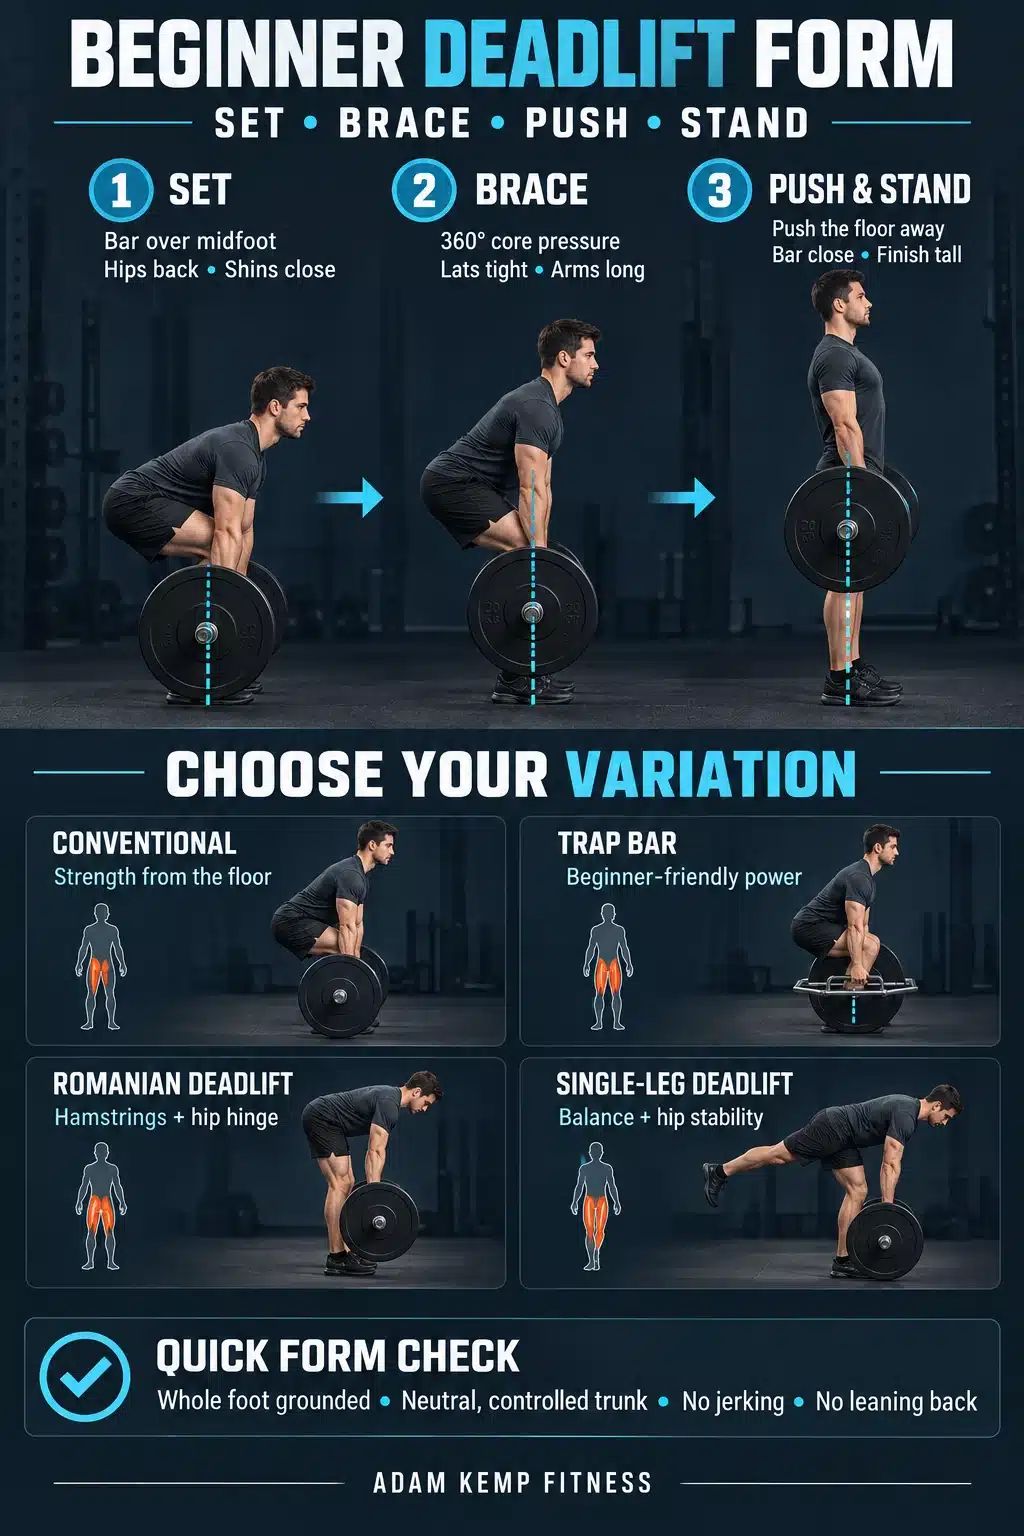
Stand with your feet approximately hip-width apart and place the bar over the middle of your feet.
For most people, this leaves roughly an inch of space between the bar and the shins before they bend down.
Your stance should be narrow enough that your arms can hang directly outside your legs.
Point your toes mostly forward or slightly outward, depending on what allows your knees to track comfortably.
The bar should remain over your midfoot throughout the setup. If it starts too far forward, it creates a longer moment arm and makes the load harder to control.
Wear firm, relatively flat shoes rather than heavily cushioned running shoes.
Soft cushioning can make it harder to generate force through a stable base, especially as weight increases.
Step 2: Hinge Down and Grip the Bar
Push your hips backward and allow your knees to bend enough for you to reach the bar.
Grip it just outside your legs with your arms hanging straight down.
Your hips should not sink into a deep squat, but they should not remain so high that the movement becomes a stiff-legged deadlift.
Your ideal position will be somewhere between those two extremes.
Use a double-overhand grip while learning.
This symmetrical grip keeps the setup simple and helps develop your forearms and grip strength.
A mixed grip or lifting straps may eventually help when your grip limits heavier working sets.
However, grip assistance should not be used to justify weights you cannot otherwise control.
Step 3: Bring Your Shins to the Bar
After taking your grip, bend your knees slightly and bring your shins forward until they lightly contact the bar.
Do not push the bar away from your midfoot.
Your shoulders will normally be slightly in front of the bar, while your shoulder blades are positioned approximately over it.
Your arms should remain vertical when viewed from the front.
Avoid trying to make your torso perfectly upright. A conventional deadlift is not a squat with the bar in your hands.
Step 4: Brace Your Trunk
Take a breath into your abdomen, sides, and lower back.
Create pressure around your entire midsection rather than lifting your chest and breathing only into the front of your rib cage.
Brace as if you were preparing to absorb physical contact.
Your torso should feel solid without forcing your lower back into an exaggerated arch.
A “neutral spine” does not mean your back must appear perfectly flat or remain motionless to the degree.
Individual spinal positions vary, and current research does not support reducing deadlift safety to a single rigid visual rule.
For beginners, however, learning to limit uncontrolled spinal movement under load remains a useful and practical strategy.
Your starting position should stay relatively consistent from the moment you initiate the pull until the bar passes your knees.
Step 5: Engage Your Lats and Remove the Slack
Before lifting, create tension between your hands, torso, and the bar.
Think about squeezing your armpits closed or pulling the bar gently toward your shins.
Then pull up just enough to remove the gap between the bar, plates, and floor.
You may hear the bar click as everything becomes connected, but the plates should not leave the ground yet.
Removing the slack prevents you from jerking suddenly against a relaxed bar.
It also gives you an opportunity to feel your brace, balance, and body position before committing to the repetition.
Step 6: Push the Floor Away
Press your whole foot into the floor and begin standing up with the weight.
Think “push the floor away” instead of “pull the bar with my back.”
Your hips and chest should initially rise together.
If your hips shoot upward while the bar remains on the floor, the weight is likely too heavy, or you have not created enough tension before initiating the lift.
Keep your arms long and relaxed.
They connect your body to the weight, but they should not bend or actively row the bar.
Step 7: Keep the Bar Close
The bar should travel almost straight upward while remaining close to your shins and thighs.
Engaging your lats helps prevent the bar from drifting forward.
Maintain pressure through your whole foot.
You should not shift onto your toes, but you also should not rock so far backward that your toes lift off the floor.
Keeping the bar close improves leverage and makes the movement more efficient.
Even a small amount of forward drift can substantially increase the challenge placed on your trunk and lower back.
Step 8: Finish Tall Without Leaning Back
Once the bar passes your knees, continue extending your hips until you are standing tall.
Finish with your hips and knees fully extended and your ribs stacked over your pelvis.
Do not aggressively lean backward or push your hips past the bar.
Hyperextending your lower back does not strengthen the lockout and may create unnecessary discomfort.
Think about standing tall and squeezing your glutes rather than thrusting your body backward.
Step 9: Lower the Bar With Control
Begin the descent by pushing your hips backward while keeping the bar close to your thighs.
Once the bar passes your knees, bend your knees and return it to the floor.
Do not turn the lowering phase into a slow-motion endurance test, especially with heavy weights.
Maintain control, but allow the plates to return to the ground efficiently.
For beginners, I prefer dead-stop repetitions. Pause, reset your breath and brace, and perform the next repetition from a stable starting position.
Touch-and-go deadlifts can be useful in certain programs, but bouncing the plates often hides poor positioning and makes each repetition less consistent.
The Most Important Deadlift Form Cues
Using too many cues at once can make a beginner overthink the lift. Start with three or four that address the most important parts of the movement:
- Bar over midfoot
- Brace before lifting
- Push the floor away
- Keep the bar close
- Finish tall
Not every cue works equally well for every person. For example, “chest up” can help someone who collapses forward, but it may cause another person to overextend their spine and lose their abdominal brace.
Film several light sets from the side and review one adjustment at a time.
My guide to recording your exercise form explains how to position your camera and evaluate your technique more accurately.
Common Beginner Deadlift Form Mistakes
Starting With the Bar Too Far Away
When the bar starts in front of your midfoot, the weight pulls you forward and increases the demand placed on your back.
Reset with the bar over your midfoot and bring your body to the bar. Do not roll the bar around while trying to find your position.
Hips Rising Before the Bar Moves
If your hips shoot upward first, your legs lose their opportunity to contribute effectively.
The lift then becomes a more demanding stiff-legged pull from the floor.
Reduce the weight, remove the slack from the bar, and focus on driving your feet into the ground while your chest and hips rise together.
Squatting the Deadlift
Starting with extremely low hips can push your knees forward into the bar and place your shoulders behind the ideal pulling position.
Your hips may then rise automatically before the plates leave the floor.
Allow your hips to sit higher than they would during a squat.
The exact height will depend on your anatomy and chosen deadlift variation.
Yanking the Bar off the Floor
A sudden pull against a relaxed bar makes it difficult to maintain tension and positioning. It also wastes energy before the weight begins moving.
Brace, engage your lats, remove the slack, and then apply force smoothly.
Letting the Bar Drift Forward
Bar drift commonly occurs when the lats lose tension or a lifter shifts onto their toes. The farther the bar moves from your center of mass, the harder it becomes to control.
Keep the bar close and maintain balanced pressure through your feet.
Bending the Arms
Your elbows should remain straight throughout a deadlift.
Trying to curl or row a heavy bar does not help you lift it and can unnecessarily stress the biceps, particularly when using a mixed grip.
Think of your arms as straps connecting your torso to the bar.
Overextending at Lockout
Leaning backward is not part of a proper lockout.
The repetition is complete when you are standing upright with your hips and knees extended.
Finish tall with your glutes engaged and your rib cage positioned over your pelvis.
Continuing After Technique Breaks Down
Deadlifts can cause substantial fatigue, especially with heavy loads or high repetition counts.
Research suggests that fatigue during repeated lifting can alter lumbar mechanics and reduce a lifter’s ability to maintain the same movement strategy (Ramirez et al., 2022).
End the set when your brace, balance, or bar path changes significantly. One additional poor repetition is rarely worth more than protecting the quality of your next training session.
Conventional Deadlift Form Tips
The conventional deadlift uses a straight bar, a hip-width stance, and a grip positioned outside the legs.
It requires you to pull the bar from in front of your body, which creates a substantial demand on the posterior chain and trunk.
Keys for conventional deadlift form include:
- Keep the bar over your midfoot.
- Position your shins close to the bar.
- Keep your hips higher than a squat but lower than a stiff-legged hinge.
- Maintain lat tension to keep the bar close.
- Push through the floor as your hips and chest rise together.
- Clear your knees before driving the hips fully forward.
Conventional deadlifts can be excellent for developing total-body strength, but they are not mandatory for general fitness or athletic performance.
If your anatomy or mobility makes the starting position consistently awkward, elevate the bar or use a trap bar while developing your hinge.
Trap-Bar Deadlift Form Tips
The trap-bar deadlift, also called a hex-bar deadlift, places you inside the implement with the load distributed around your body.
This position generally allows a more upright torso and greater knee contribution than a straight-bar deadlift.
Biomechanical research indicates that trap-bar deadlifts can produce higher peak force, velocity, and power under certain loading conditions, while straight-bar deadlifts create greater demands around the hip and lumbar spine (Swinton et al., 2011).
Other research has found greater quadriceps activity during the trap-bar deadlift and greater biceps femoris activity during the straight-bar version (Camara et al., 2016).
Keys for trap-bar deadlift form include:
- Stand in the center of the bar rather than too far forward or backward.
- Keep the handles aligned with your midfoot.
- Brace before lifting and keep your shoulders packed.
- Push through the floor without allowing your knees to collapse inward.
- Stand tall without shrugging or leaning backward.
- Lower your hips and torso together as the weight returns to the floor.
High handles reduce the range of motion and may suit beginners, tall lifters, or people rebuilding strength.
Low handles increase the required range of motion and should be introduced only when you can maintain your position.
For basketball players and other athletes, the trap bar is often my preferred heavy deadlift variation.
It allows substantial lower-body loading and force production without requiring conventional deadlift proficiency to become the main goal of the program.
Romanian Deadlift Form Tips
The Romanian deadlift, or RDL, begins from a standing position rather than from the floor.
It primarily trains the hip hinge and places the hamstrings under tension as the hips move backward.
Unlike the conventional deadlift, the RDL uses only a small amount of knee bend.
The goal is not to lower the weight as far as possible; it is to move through the range of motion your hips and hamstrings can control.
Keys for Romanian deadlift form include:
- Begin standing tall with the weight against your thighs.
- Keep your knees softly bent but relatively stable.
- Push your hips backward rather than squatting downward.
- Keep the bar or dumbbells close to your legs.
- Stop when you feel strong hamstring tension or before your back position changes.
- Drive your hips forward to return to standing.
Research supports the RDL as an effective exercise for recruiting the hamstrings and other posterior-chain muscles (Coratella et al., 2022).
However, muscle activation data should not be interpreted as proof that one variation is universally superior.
For beginners, the RDL is one of the best exercises for learning how a hip hinge should feel.
Start with dumbbells or an unloaded bar, and focus on hinging your hips back while keeping your trunk stable.
Do not assume the weights must reach the floor.
Depending on your mobility and proportions, the correct stopping point may be just below your knees or around the middle of your shins.
Single-Leg Deadlift Form Tips
The single-leg deadlift combines a hip hinge with single-leg balance and frontal-plane stability.
It can help develop the hamstrings and glutes while challenging your foot, ankle, hip, and trunk to control rotation.
Because balance becomes a limiting factor, the single-leg deadlift is not normally the best variation for maximizing total load.
Its value comes from unilateral control, coordination, and the ability to identify differences between sides.
Keys for single-leg deadlift form include:
- Begin with your weight centered over one foot.
- Keep a soft bend in the stance-leg knee.
- Reach the opposite leg backward as your torso inclines forward.
- Keep your hips relatively square to the floor.
- Maintain a long line from your head through your rear heel.
- Push through the stance foot and drive the hip forward to stand.
- Use a wall or rack for support when balance limits the exercise.
Single-leg deadlifts recruit the gluteus maximus and hamstrings while increasing the stabilization demands placed on the gluteus medius (Kang et al., 2021).
This combination makes them especially useful for athletes whose sports involve running, cutting, jumping, and landing on one leg.
Hold the weight in the hand opposite your stance leg to increase the rotational challenge.
Hold it on the same side, or use two dumbbells for more external load with slightly less coordination demand.
A kickstand RDL is an excellent transition between bilateral and true single-leg deadlifts.
Keep the rear toes lightly on the ground for balance while the front leg performs most of the work.
Conventional vs. Trap Bar vs. RDL vs. Single-Leg Deadlift
| Variation | Primary purpose | Beginner advantage | Main technical priority |
|---|---|---|---|
| Conventional deadlift | Heavy total-body and posterior-chain strength | Teaches lifting from the floor | Keep the bar over midfoot and close to the body |
| Trap-bar deadlift | Lower-body strength, force, and power | Load stays closer to your center of mass | Stand in the center and push through the floor |
| Romanian deadlift | Hamstring strength and hip-hinge development | Starts from standing | Push the hips back without turning it into a squat |
| Single-leg deadlift | Unilateral strength, balance, and hip stability | Can be trained effectively with lighter weights | Keep the pelvis controlled and stance foot stable |
These exercises are related but not interchangeable.
A good program may use a trap-bar or conventional deadlift as its main strength lift, an RDL for additional posterior-chain work, and a single-leg deadlift for unilateral control.
How Much Weight Should a Beginner Deadlift?
Start with a weight that allows every repetition to look nearly identical.
You should finish the set knowing you could perform at least two or three additional clean repetitions.
A practical progression may look like this:
- Bodyweight hip hinge
- Elevated kettlebell deadlift
- Kettlebell deadlift from the floor
- Trap-bar deadlift or elevated barbell deadlift
- Conventional barbell deadlift from the floor
For your first working sets, perform approximately two to four sets of three to six repetitions.
Lower-repetition sets give you frequent opportunities to reset without accumulating enough fatigue to distort the movement.
Increase the weight only when your setup, brace, and bar path remain consistent.
Adding 5–10 pounds is progress; you don’t need to make large jumps just because the previous session felt comfortable.
Most beginners can practice a deadlift variation once or twice per week. Your ideal frequency depends on the rest of your strength-training program, recovery capacity, exercise selection, and overall workload.
Should Beginners Use a Deadlift Belt or Straps?
Beginners do not need a lifting belt to learn the deadlift.
You should first develop the ability to brace your trunk without relying on equipment.
A belt can eventually provide additional feedback and help you create greater intra-abdominal pressure during heavy lifts.
It does not physically hold your spine in place or compensate for poor load selection.
My guide on when to use a lifting belt for deadlifts provides a more detailed explanation of when one may become helpful.
Straps are useful when your grip gives out before the muscles you are trying to train, particularly during RDLs or higher-volume posterior-chain work.
Use them strategically, not on every set, so you keep developing grip strength.
How to Include Deadlifts in Your Workout Program
Place heavy deadlifts near the beginning of your workout after completing a progressive warm-up.
They require more coordination and focus than most accessory exercises, so performing them when highly fatigued can reduce movement quality.
A simple beginner session might include:
- Trap-bar or conventional deadlift: 3 sets of 3–5 repetitions
- Split squat or step-up: 3 sets of 6–10 repetitions per leg
- Romanian deadlift: 2–3 sets of 6–10 repetitions
- Row or pull-up variation: 3 sets of 6–12 repetitions
- Anti-extension or anti-rotation core exercise: 2–3 sets
You do not need conventional deadlifts, RDLs, and heavy trap-bar deadlifts in the same workout.
Choose one primary bilateral variation and add a lighter accessory variation only if it supports your goal and recovery capacity.
If your main goal is building muscle, use deadlifts as part of a broader program rather than expecting one exercise to train every muscle optimally.
If your goal is athleticism, combine strength work with appropriately programmed jumping, sprinting, mobility, and sport practice.
Are Deadlifts Bad for Your Back?
Deadlifts aren’t automatically bad for your back, but they aren’t automatically therapeutic either.
The effect depends on the person, technique, dose, progression, symptoms, and training context.
Programs containing deadlifts have improved pain and function in some people with mechanical low-back pain, but they have not consistently outperformed lower-load motor-control exercise.
People with lower pain levels and better baseline back-extensor strength may tolerate deadlift-based rehabilitation more successfully (Fischer et al., 2021).
That distinction matters because deadlifts should not be casually prescribed as a cure for back pain.
They are one loading option that may be appropriate when introduced gradually and matched to the individual.
Stop the exercise if you experience sharp pain, radiating symptoms, numbness, sudden weakness, or symptoms that worsen with each repetition.
Seek an assessment from a qualified healthcare professional rather than trying to diagnose the problem from a form video.
Beginner Deadlift Form Checklist
Before every repetition, ask yourself:
- Is the weight positioned over my midfoot?
- Are my feet stable?
- Are my arms straight?
- Have I braced my entire trunk?
- Have I engaged my lats and removed the slack?
- Can I push through the floor without my hips shooting upward?
- Can I keep the weight close?
- Can I finish tall without leaning backward?
- Can I lower the weight while maintaining control?
You do not need every repetition to look identical to someone else’s deadlift. You need your repetitions to remain consistent with your structure, chosen variation, and current ability.
Final Thoughts on Beginner Deadlift Form
The deadlift becomes safer and more productive when you treat it as a skill rather than a demonstration of toughness.
Choose a manageable variation, establish your position before every repetition, and increase the load only after your movement becomes consistent.
Conventional deadlifts are excellent for developing strength from the floor, trap-bar deadlifts are versatile for athletes and beginners, RDLs teach the hip hinge and strengthen the hamstrings, and single-leg deadlifts build unilateral control.
None is universally best, and many lifters benefit from using more than one variation across their program.
The most important lesson in beginner deadlift form is simple: control the weight you can lift today so you can continue getting stronger tomorrow.
This website does not provide medical advice. This website site does contain affiliate links, and purchases may earn a commission.
Read my Medical Disclaimer, Review Disclaimer, and Publishing Policies for more details. Use of this site indicates acceptance of these terms.
Check Out Some of My YouTube Videos Below, and Please Follow on YouTube for More Educational Health and Fitness Content!