How to Record Your Form During a Workout
 Reading Time: 7 minutes
 Recording your workouts can be one of the simplest ways to see what is actually happening during a movement.
Learning how to record your own form during a workout sounds simple until you try to film more than one exercise or move beyond a small area.
I record much of my training, including strength exercises, jumps, sprint work, and basketball drills.
Video often shows me details I couldn’t feel while performing the movement, especially when I am moving quickly or starting to fatigue.
A squat may feel balanced until I see my weight shifting forward on video.
A jump can feel explosive, even though the recording shows I rushed the takeoff or didn’t absorb the landing as well as I intended.
The problem is that recording can also interrupt the workout.
You position your phone, start the video, complete the set, walk back to check the angle, and then realize part of the movement was outside the frame.
This is manageable when filming squats or another exercise performed in one spot, but it becomes much more frustrating during sprints, agility drills, court work, and outdoor training.
Different workouts require different recording setups.
A phone and tripod may give you the best view of full-body mechanics, while hands-free cameras can make it easier to capture drills across a wider area.
The best option depends on what you want to see, where the exercise takes place, and whether recording it will interfere with the quality of your workout.
Why Recording Your Form Can Be Useful
Video gives you a perspective that you cannot get from feeling alone.
Athletes develop a strong sense of body position over time, but perception is not always perfectly accurate, particularly when fatigue or heavier loads change the movement.
Something that feels identical from rep to rep may look noticeably different on camera.
This makes video especially useful when you are working on a specific technical cue.
Maybe you are trying to keep your knees in a better position during a squat, maintain a more stable torso during a deadlift, or prevent your shoulders from rising during a running drill.
Recording the movement gives you something concrete to compare against the cue you are trying to follow.
It can also help when working with a coach.
Instead of describing how a movement felt, you can show exactly what happened.
The most useful approach is not to record everything simply because you can. Record movements where visual feedback can help answer a specific question.
That turns video into a training tool rather than just a collection of workout clips.
Review the Footage With Specific Goals In-Mind
Recording does not automatically improve technique.
The improvement comes from what you do with the footage afterward.
Instead of watching an entire session and asking whether your form “looks good,” choose one or two things to assess.
For example:
Did your torso angle stay consistent?
Did your knees move in the direction you intended?
Did your head position change as you became tired?
Did your technique look different on the final reps compared with the first few?
A specific question makes the footage much easier to evaluate.
Slow-motion playback can also help with movements that happen too quickly to assess accurately at normal speed.
It can make changes in joint position, foot placement, or bar movement easier to notice.
If you work with a coach, use their cues as your reference point.
If the instruction was to maintain a particular position, the video should help you determine whether you actually did it.
That is much more useful than trying to judge whether a movement simply “looks right.”
How to Record Yourself While Working Out
A Phone and Tripod Still Work Well for Fixed Exercises
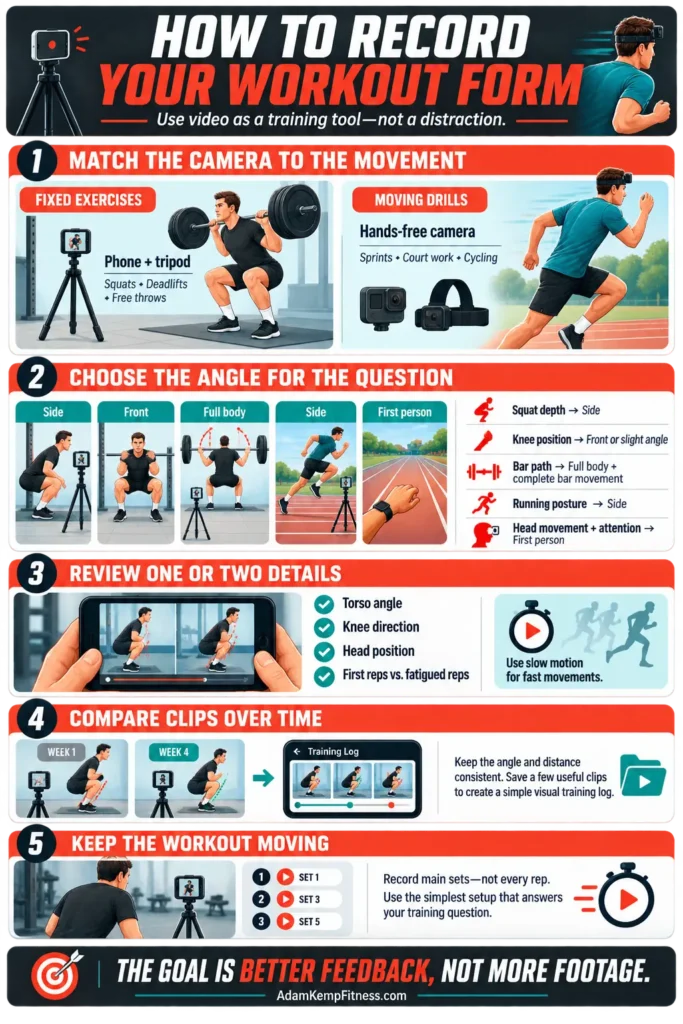
For strength training and stationary drills, a phone and small tripod are often all you need.
Squats, bench presses, deadlifts, free throws, stationary bike intervals, and many other exercises happen within a predictable area.
Deadlifts are an especially important exercise to consider recording because beginner deadlift form is not easy to learn, and you can make significant improvements by recording your deadlifts and consistently watching them as you progress in weight and reps.
Once you find a useful camera angle, the setup can stay relatively simple.
A flexible tripod can make positioning easier because it can attach to racks, railings, benches, or other stable structures.
Wide-angle camera settings can also provide a little more room for error when framing the shot.
Camera position matters more than expensive equipment.
If you want to assess squat depth or torso position, filming from the side or from a slight rear angle may tell you much more than filming directly from the front.
For barbell movements, the camera should usually be far enough away to capture the full body and the bar’s full range of motion.
The limitation becomes obvious when your workout involves travelling across space.
A fixed phone cannot follow you through a sprint, dribbling drill, agility sequence, or longer movement pattern.
You may end up capturing only part of the exercise or repeatedly moving the camera between sets.
That is when a different approach starts to make more sense.
Hands-Free Recording Can Reduce Setup During Moving Drills
For movement-based sessions, wearable recording can remove some of the constant setup.
For training that involves more movement, wearable recording can be useful because it removes the need to keep returning to a fixed camera.
This is especially relevant for running, cycling, court drills, or outdoor sessions where an athlete regularly moves out of a phone’s frame.
Wearable options can include chest-mounted cameras, body clips, or newer options like Oakley sunglasses with camera, depending on the type of footage you want to capture.
These options are better suited to documenting movement from the athlete’s perspective, while an external camera remains more useful when the goal is to analyze full-body mechanics.
That perspective can be useful for certain types of training.
During running drills, court work, cycling, or field sessions, first-person footage can show where you were looking, how your head moved, how you approached space, and what was happening in front of you during the drill.
It can also make general session documentation easier.
If you are training alone, you are less likely to miss a rep simply because you forgot to press record or moved out of the camera frame.
However, first-person footage has limits.
If you are trying to analyse knee tracking, hip position, spinal alignment, or the complete mechanics of a lift, an external camera angle is usually more useful.
You cannot properly judge your own full-body positioning from a camera mounted close to your eyes.
For that reason, wearable recording and fixed-camera recording should not necessarily be treated as competitors.
They solve different problems.
A wearable camera can capture the overall session and movement through space, while a phone positioned externally can record the specific lifts or drills where you need to see your entire body.
Use the Right Camera Angle for the Question You Are Asking
Before recording a set, decide what you actually want to learn from the footage.
If you want to check squat depth, film from the side.
If you are analysing knee position, a front or slightly angled view may be more useful.
If bar path is the concern, position the camera so both the athlete and bar remain visible throughout the repetition.
For running drills, you may want footage from the side to examine posture and stride, while first-person footage can tell you more about head movement and where your attention is directed.
This simple step prevents a common problem: recording plenty of footage that does not actually show the thing you wanted to evaluate.
One good angle with a clear purpose is usually more useful than several random clips.
Compare Similar Clips Over Time
One workout clip tells you what happened on one day.
A collection of comparable clips can show whether your technique is actually improving.
Try to record important movements from approximately the same angle and distance when possible.
That makes comparisons much easier.
You might notice that a movement that looked unstable six weeks ago now appears much more controlled.
You may also see that a technical problem returns whenever the load becomes heavier or you reach the end of a difficult session.
Those patterns are difficult to identify from memory alone.
You do not need to save every repetition.
Keeping a few useful clips from important exercises or drills can create a simple visual training log without filling your phone with hours of footage.
Do Not Let Recording Disrupt the Workout
There is also a point where documenting training becomes counterproductive.
If you spend more time adjusting cameras than completing your session, the setup is probably too complicated.
The goal is not to create perfect footage. It is to collect enough useful information to improve the way you train.
For fixed lifts, that may mean placing your phone once and recording only your main working sets.
For moving drills, a hands-free option may reduce interruptions.
For technically demanding exercises, you may still want an external camera even if you are using wearable technology for the rest of the workout.
The simplest setup that answers your training question is usually the best one.
Final Thoughts: Keys to Recording Yourself While Working Out
Recording your training can provide useful feedback, but only when the setup fits the type of movement you are performing.
A phone and tripod remain effective for lifts and drills performed in a fixed area because they allow you to see full-body mechanics from a useful external angle.
For workouts with more movement, hands-free recording makes it easier to capture the session without repeatedly stopping to reposition the camera.
Neither approach is ideal for everything.
Think first about what you want to analyse, choose an angle that actually shows it, and review the footage with a specific technical question in mind.
The real value isn’t in having more workout videos, but using a small amount of useful footage to make your next session better.
This website does not provide medical advice. This website site does contain affiliate links, and purchases may earn a commission.
Read my Medical Disclaimer, Review Disclaimer, and Publishing Policies for more details. Use of this site indicates acceptance of these terms.
Check Out Some of My YouTube Videos Below, and Please Follow on YouTube for More Educational Health and Fitness Content!
![Subscribe to @AdamKempFitness for more training, general health, recovery, and nutrition tips from a professional basketball player with a master’s degree in Nutrition Education! 🏀💪
Seated Max Vertical Jumps From a Box are one way I train explosive takeoff power with maximum intent on every rep.
Starting seated, with a pause and minimal rocking or dipping, reduces the contribution of a quick countermovement and emphasizes producing force from a relatively static position (National Strength and Conditioning Association [NSCA], 2020).
For athletes, the training goal is explosive lower-body force production and coordinated extension through the hips, knees, and ankles. I use this variation to practice driving hard into the floor and accelerating my body upward.
My preferred setup: 3 sets of 3 reps or 4 sets of 2 reps, supersetted with a strength or power exercise.
I keep the reps low, reset between jumps, and take longer rest periods so I’m ready to attack every takeoff. Even when pairing exercises, I give myself enough recovery to keep the jumps sharp.
Every rep has one goal: jump as high as possible. I focus on an explosive takeoff, a controlled landing, and consistent quality throughout the session.
Save this for your next power workout! 🚀
Reference: NSCA. (2020). Stretch-shortening cycle.
#VerticalJump #JumpTraining #ExplosivePower #AthleticPerformance #BasketballTraining](https://www.adamkempfitness.com/wp-content/plugins/feeds-for-youtube/img/placeholder.png)