How to Improve Squat Depth Without Pain or Forced Stretching
 Reading Time: 12 minutes
 Learning how to improve squat depth became especially important to me after undergoing meniscus repair in January 2025.
Although I could squat during the following basketball season, I lacked the strength, control, and confidence to reach the depth that had once felt natural.
I grew up doing gymnastics, which gave me naturally mobile hips and a strong foundation for squatting.
However, years of basketball left my ankles tight, and longstanding glute weakness made me overly reliant on my quads and the front of my body.
The knee injury magnified those limitations.
As I protected the repaired knee, I became less comfortable loading deeper positions and had to rebuild the movement rather than assume my previous mobility would return on its own.
At 6’10”, my long femurs add another challenge, but I recently set an all-time front squat personal record of 115 kilograms with some of the best depth I have achieved.
If you enjoyed this video, please subscribe to my YouTube channel for more training videos, exercise demonstrations, and practical lessons from my experience as a professional basketball player.
This new progress changed how I think about improving squat depth because my solution involved much more than stretching.
Good squat depth depends on finding a stance that fits your structure, maintaining pressure across your entire foot, achieving enough ankle dorsiflexion, bracing effectively, and building strength throughout the descent and at the bottom position.
If one of those pieces is missing, forcing yourself lower usually leads to compensation rather than useful mobility.
The biggest improvements in my squat came from barefoot heel-elevated goblet squats and front squats with slow eccentrics and long pauses.
I also used knees-over-toes split squats, landing and deceleration drills, daily mobility work, foam rolling, and focused posterior-chain training to rebuild my glutes and become less dependent on my quads.
My experience relearning how to improve squat depth taught me that mobility becomes valuable when you can control and generate force through it, and that the goal is to gradually earn deeper squats, not to push your body into a position it cannot yet stabilize.
What Good Squat Depth Actually Means
For strength training, parallel generally means the crease of the hip reaches approximately the same height as the top of the knee.
A full squat moves below that point, although the exact appearance of the movement depends on your body proportions, mobility, stance, and squat variation.
Training through a larger range of motion can produce valuable strength and muscle adaptations when the position is comfortable and controlled.
Research comparing different squat depths suggests that full squats can produce greater improvements in some measures of lower-body strength, muscle development, and athletic performance than consistently training with shallower squats (Kubo et al., 2019; Pallarés et al., 2020).
However, deeper is not automatically better.
The most useful depth is the lowest position you can reach while maintaining balance, tension, and a movement pattern appropriate for the exercise.
A slightly higher squat performed without pain may be more productive than a deep squat in which your heels rise, your balance shifts, or you collapse under the load.
Depth should be judged alongside control rather than treated as the only measure of squat quality.
Your Squat Does Not Need to Look Like Someone Else’s
Squat mechanics vary considerably between individuals.
Femur length, torso length, hip structure, ankle mobility, training history, and previous injuries can all change how a squat looks.
As a 6’10” athlete with long femurs, I naturally need more forward torso inclination than someone with shorter legs.
Trying to copy a compact weightlifter’s torso position would make my squat feel less natural and could prevent me from using my hips effectively.
The squat variation matters as well. High-bar back squats, low-bar back squats, front squats, safety-bar squats, and goblet squats place the load in different positions, changing how the hips, knees, ankles, and torso contribute.
Your best squat is therefore not the one that looks most like somebody else’s.
It is the version that allows you to use an appropriate range of motion while staying balanced and producing force efficiently.
How to Squat Deeper: A Step By Step Strategy
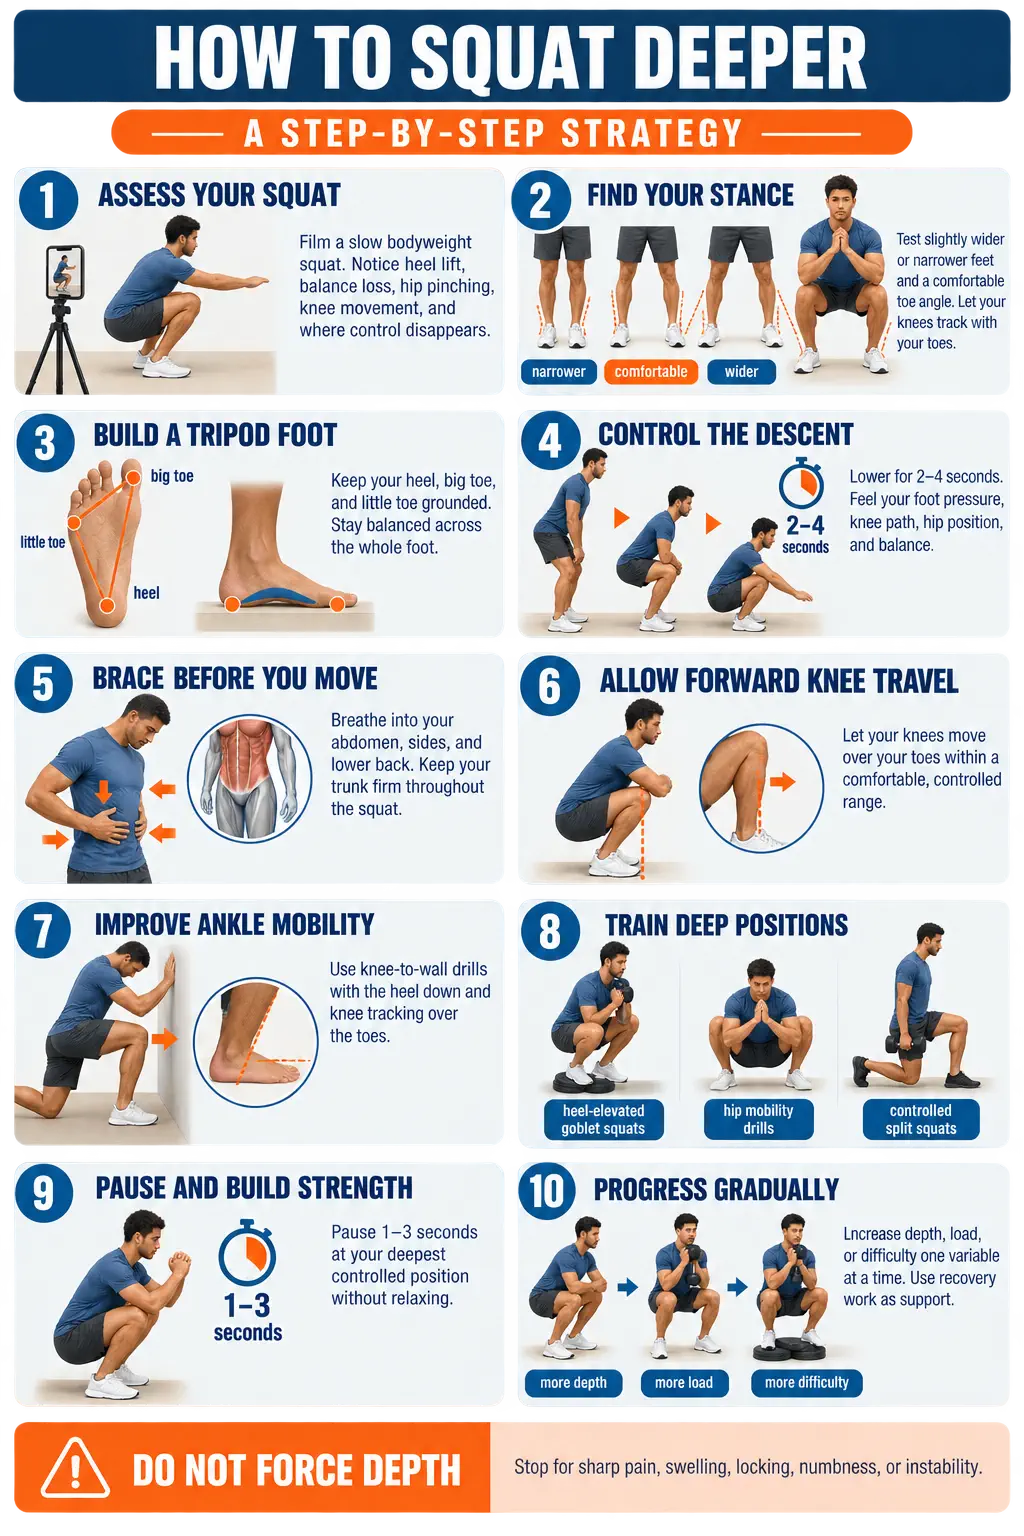
Learning how to squat deeper begins with identifying what currently limits your movement.
Instead of forcing the bottom position, follow these steps to improve your stance, ankle mobility, balance, bracing, and strength in a logical order.
Make one adjustment at a time and pay attention to how your squat changes.
This will help you figure out what your body needs while gradually building a deeper, stronger, more repeatable squat.
Find What Is Limiting Your Squat Depth
Before doing more mobility exercises, determine what happens when your squat begins to break down.
Perform a slow bodyweight squat in your normal stance. Reach your arms forward, descend under control, and notice where you lose balance, tension, or comfort.
Common signs can provide useful clues:
- If your heels rise, limited ankle dorsiflexion may be contributing.
- If you fall backward, you may need a counterbalance, more forward knee travel, or a different stance.
- If you feel a hard pinch at the front of the hip, your stance or toe angle may not suit your hip structure.
- If your knees move inward unexpectedly, you may be losing foot pressure or control.
- If you can squat deeply with a light weight in front but not with a barbell, bracing, balance, bar position, or confidence under load may be the larger issue.
- If your depth becomes progressively shallower during a set, the load or number of repetitions may exceed what you can currently control.
Ankle mobility is particularly important. Weight-bearing ankle dorsiflexion has been positively associated with back squat depth, although it is only one part of the movement (Gomes et al., 2022).
Record your squat from the side and from a front-diagonal angle when possible. Video may reveal heel movement, weight shifts, or changes in torso position that you cannot feel while lifting.
Adjust Your Squat Stance
Many squat-depth problems improve when you stop trying to force a predetermined stance.
Begin with your feet approximately shoulder-width apart.
Test slightly wider and narrower positions, then turn your toes outward modestly until your hips can descend comfortably between your legs.
Your knees should generally travel in the same direction as your toes.
They don’t need to stay perfectly straight ahead, and your stance doesn’t need to be completely symmetrical if your anatomy or injury history makes a small adjustment more comfortable.
A wider stance may give a larger athlete more room to descend between the hips.
A narrower stance may feel more natural during a front squat or high-bar squat, but neither position is universally correct.
Use the stance that allows you to stay balanced without producing hip pinching or joint pain.
Maintain Pressure Across Your Entire Foot
Foot pressure affects everything above it.
If your foot loses contact with the floor, the knees and hips must compensate for an unstable foundation.
Keep your heel, the base of your big toe, and the base of your little toe connected to the ground.
This is often called maintaining a tripod foot.
Avoid shifting completely onto your toes, but do not overcorrect by sitting excessively far back onto your heels.
The pressure may move slightly during the squat, but all three contact points should remain grounded.
Squatting barefoot during some of my heel-elevated goblet squats helped me feel these pressure changes more clearly.
The wedge provided the heel elevation, while removing cushioned shoes gave me more direct feedback from the floor.
Control the Descent
One of the best ways to improve depth is to slow down.
During warm-up sets, take approximately two to four seconds to descend.
A controlled eccentric gives you time to feel your foot pressure, knee path, hip position, and balance before reaching the bottom.
I used slow eccentrics extensively in heel-elevated goblet squats and front squats. Instead of dropping into the deepest possible position, I gradually lowered myself into it and maintained tension once I arrived.
You do not have to squat slowly forever.
The slower tempo is a teaching tool that helps you recognize and strengthen positions that are easy to rush through.
Brace Before You Squat
A strong brace creates a stable connection between the weight and your lower body.
Before beginning the descent, breathe into your abdomen, sides, and lower back.
Tighten your trunk as though you are preparing to absorb contact, then maintain that pressure as you lower.
Bracing does not mean sucking in your stomach or holding your chest unnaturally high.
You want a firm torso that allows your hips and knees to move without the weight folding you forward.
If you can reach depth with a goblet squat but lose it during a front or back squat, the difference may be your ability to brace under the bar rather than a lack of flexibility.
Allow Your Knees to Travel Forward
Your knees can move over your toes during a squat.
Trying to keep your shins vertical may push your hips too far backward, disrupt your balance, and make adequate depth unnecessarily difficult.
Forward knee travel is especially important during front squats, high-bar squats, and other upright squat variations.
Taller lifters may need substantial knee and hip movement to keep their combined center of mass over the middle of their feet.
The amount should still match your current tolerance.
Controlled knee travel without pain is different from suddenly forcing your knees farther forward than you can stabilize.
Knees-over-toes split squats were useful during my recovery because they allowed me to gradually load deeper knee and ankle positions one leg at a time.
That strength eventually transferred into more confidence during bilateral squats.
Improve Ankle Mobility in a Weight-Bearing Position
Limited ankle dorsiflexion can cause your heels to lift, increase forward torso lean, or prevent your knees from traveling far enough forward.
It is best assessed and trained in a weight-bearing position similar to squatting.
The knee-to-wall drill is a simple option:
- Place one foot a few inches from a wall.
- Keep your heel and forefoot flat.
- Drive your knee toward the wall in line with your toes.
- Pause briefly without allowing the arch to collapse.
- Complete eight to 12 controlled repetitions per side.
Move the foot farther from the wall only when you can touch the wall without your heel rising.
The goal is not to achieve the greatest possible stretch; it is to control dorsiflexion while keeping the entire foot stable.
Calf and soleus restrictions may feel different.
Perform some repetitions with a relatively straight knee and others with a bent knee to work through both positions.
Strengthen Your Hip Mobility
Passive hip flexibility does not guarantee that you can control a deep squat.
You also need strength in the adductors, glutes, and other hip muscles throughout the available range.
Adductor rock-backs are useful for exploring hip flexion without loading the entire squat.
Start on your hands and knees, extend one leg to the side, and slowly shift your hips back while keeping your trunk stable.
A counterbalanced squat pry is another option.
Hold a light dumbbell or kettlebell in front of your chest, descend into a comfortable squat, and gently explore the position while maintaining full-foot pressure.
You can shift slightly from side to side, but do not push into a sharp hip pinch.
If changing your stance or toe angle does not resolve the discomfort, stop forcing the position.
Use Heel-Elevated Squats Strategically
Heel elevation reduces the ankle angle required to reach a given squat position and can help some lifters squat deeper with a more upright torso.
A 2026 systematic review found that heel elevation increased ankle and knee range of motion during squatting, with larger elevations producing greater changes at the ankle (Ghasemi et al., 2026).
This supports using weightlifting shoes, wedges, or small plates as legitimate training tools rather than “cheating.”
Heel-elevated squats were one of the most useful parts of my own progression.
They allowed me to train the knee and hip angles I wanted before I had enough ankle mobility and confidence to access those positions in every squat variation.
However, elevation should be appropriate for the exercise.
More is not always better, and an excessively high wedge can change loading in ways that may not match your goals.
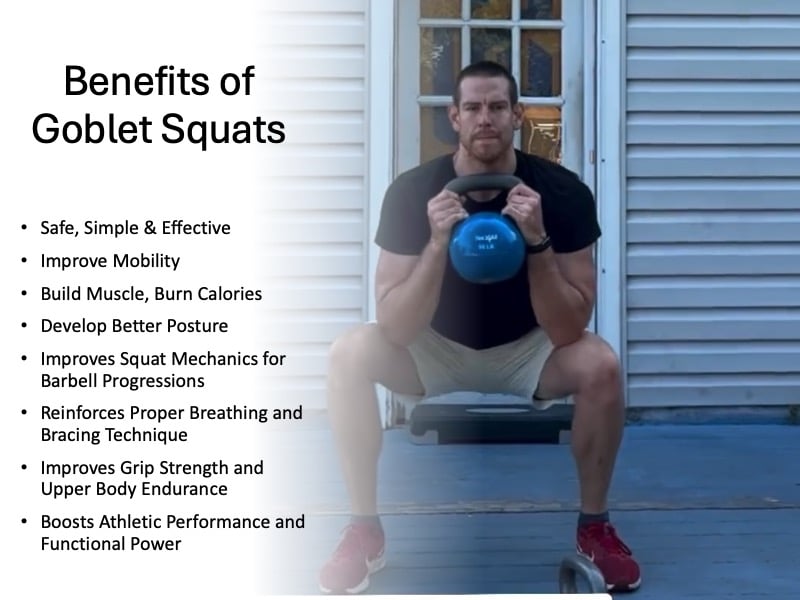
Use Goblet Squats as a Counterbalanced Regression
Goblet squats are one of the most effective exercises for learning depth because the weight in front of your body acts as a counterbalance.
Hold a dumbbell or kettlebell close to your chest and descend slowly.
The forward load often makes it easier to stay balanced while sitting between your hips.
If necessary, combine a goblet squat with moderate heel elevation.
This setup allows you to practice a deep position with less load and fewer balance demands than a barbell squat.
Once the movement feels stable, gradually increase the load, reduce the heel elevation, or progress to front squats.
You do not need to change all three variables at the same time.
Pause at the Bottom Without Relaxing
Paused squats helped me become comfortable producing force from deeper positions.
Use a light or moderate load and pause for one to three seconds near the bottom.
Keep your feet active, knees controlled, and trunk braced instead of relaxing against your joints.
The pause should occur at the deepest position you can control consistently.
Over time, you may find that this position becomes lower without any need to force it.
Long pauses with goblet squats and lighter front squats gave me repeated exposure to the bottom position.
By the time I attempted heavier front squats, that depth no longer felt unfamiliar.
Train Single-Leg Strength Through Deep Ranges
Split squats allow you to train hip, knee, and ankle mobility without requiring both sides to move identically.
Begin with a range that feels comfortable and gradually allow the front knee to travel farther forward.
Maintain full-foot pressure and lower the back knee under control.
Longer stances usually place more demand on the hips, while shorter stances and greater forward knee travel increase the demand on the ankle and knee.
Adjust the exercise according to the position you need to strengthen.
For me, knees-over-toes split squats helped rebuild tolerance after meniscus surgery.
They allowed me to strengthen deeper knee-flexion positions progressively rather than testing everything under a heavy bilateral squat.
Improve Deceleration and Landing Control
Squat mobility should transfer to athletic movement.
Lunge drops, depth drops, and controlled landing exercises helped me relearn how to absorb force through my ankles, knees, and hips.
These drills connected the mobility and strength I developed in the gym with the positions I use on a basketball court.
Landing work should begin with low heights and predictable patterns.
The goal is to land quietly, maintain foot pressure, and control the knees and hips before increasing speed or height.
This work may not look like conventional mobility training, but the ability to absorb force is an important form of active mobility.
A position is more useful when you can reach it quickly and still control it.
Use Recovery Work as Support
Foam rolling, floss bands, and compression boots have also been part of my routine.
They can help me feel less stiff and better prepared to train, but I do not view them as replacements for progressive strength work.
I have often used an approximately 25 minutes of full-body foam rolling alongside daily mobility exercises.
The immediate reduction in stiffness can make deeper positions more comfortable, but the lasting progress comes from repeatedly strengthening those positions afterward.
Use recovery tools to prepare for productive training, but do not expect passive treatments alone to permanently change your squat.
Safety Tips for Learning How to Improve Squat Depth
When learning how to improve squat depth, never sacrifice control simply to reach a lower position.
Depth should increase gradually as you develop the mobility, balance, and strength needed to stabilize each new portion of the movement.
Use bodyweight squats, goblet squats, or lightly loaded variations when testing a deeper range.
Add heavier loads only after you can repeat the same depth without losing foot pressure, balance, or trunk tension.
“Butt wink” refers to the pelvis tucking underneath the body as the lumbar spine flexes near the bottom of a squat.
A small amount of pelvic movement is common and is not automatically a sign of injury or poor technique.
The greater concern is a sudden, uncontrolled change in spinal position under a heavy load.
If your pelvis tucks sharply and your torso loses tension at the same point during each repetition, you may have descended beyond the range you can currently stabilize.
Stop slightly above the point where your position breaks down and use slow eccentrics or paused squats to strengthen that depth.
Gradually lower the position as your control improves instead of forcing your body farther down.
Perform heavy barbell squats inside a rack with the safety arms set slightly below your lowest controlled position.
Use a capable spotter when appropriate, and avoid testing unfamiliar depths when you are already fatigued.
Muscular effort and mild stretching sensations are different from joint pain.
Stop squatting and seek guidance from a qualified physical therapist or sports medicine professional if you experience sharp pain, swelling, locking, numbness, instability, or symptoms that continue after training.
This website does not provide medical advice. This website site does contain affiliate links, and purchases may earn a commission.
Read my Medical Disclaimer, Review Disclaimer, and Publishing Policies for more details. Use of this site indicates acceptance of these terms.
Check Out Some of My YouTube Videos Below, and Please Follow on YouTube for More Educational Health and Fitness Content!
![Subscribe to @AdamKempFitness for more training, general health, recovery, and nutrition tips from a professional basketball player with a master’s degree in Nutrition Education! 🏀💪
Seated Max Vertical Jumps From a Box are one way I train explosive takeoff power with maximum intent on every rep.
Starting seated, with a pause and minimal rocking or dipping, reduces the contribution of a quick countermovement and emphasizes producing force from a relatively static position (National Strength and Conditioning Association [NSCA], 2020).
For athletes, the training goal is explosive lower-body force production and coordinated extension through the hips, knees, and ankles. I use this variation to practice driving hard into the floor and accelerating my body upward.
My preferred setup: 3 sets of 3 reps or 4 sets of 2 reps, supersetted with a strength or power exercise.
I keep the reps low, reset between jumps, and take longer rest periods so I’m ready to attack every takeoff. Even when pairing exercises, I give myself enough recovery to keep the jumps sharp.
Every rep has one goal: jump as high as possible. I focus on an explosive takeoff, a controlled landing, and consistent quality throughout the session.
Save this for your next power workout! 🚀
Reference: NSCA. (2020). Stretch-shortening cycle.
#VerticalJump #JumpTraining #ExplosivePower #AthleticPerformance #BasketballTraining](https://www.adamkempfitness.com/wp-content/plugins/feeds-for-youtube/img/placeholder.png)